Sharp AR-151 Specifiche Pagina 47
- Pagina / 170
- Indice
- SEGNALIBRI
- DIGITAL COPIER 1
- VORSICHT 2
- ADVARSEL 2
- VARNING ! 2
- [1] GENERAL 4
- [2] SPECIFICATIONS 5
- C. Copy performance 6
- [3] CONSUMABLE PARTS 16
- 2. Environmental 17
- 4. TD cartridge replacement 18
- 1. Appearance 19
- 2. Internal 19
- 3. Operation panel 20
- 191817161514 20
- FAX STARTSTOP 21
- 5. Motors and solenoids 22
- 6. Sensors and switches 23
- 7. PWB unit 24
- 8. Cross sectional view 25
- 1. COPIER INSTALLATION 26
- 2. CAUTIONS ON HANDLING 26
- 8. LOADING COPY PAPER 28
- Paper guide (B) 29
- Paper guide (A) 29
- [6] OPERATIONAL DESCRIPTIONS 30
- 2. Scanner section 31
- 3. Laser unit 31
- 4. Fuser section 32
- A. Outline 36
- C. Operational descriptions 37
- A. Initial state 38
- B. Front copy 38
- C. Back copy 38
- Communicatinon error flag ON 39
- Response received? 40
- Command received? 42
- Auto dial sending 43
- [7] DISASSEMBLY AND ASSEMBLY 44
- C. Disassembly procedure 46
- D. Assembly procedure 46
- E. Charger wire cleaning 46
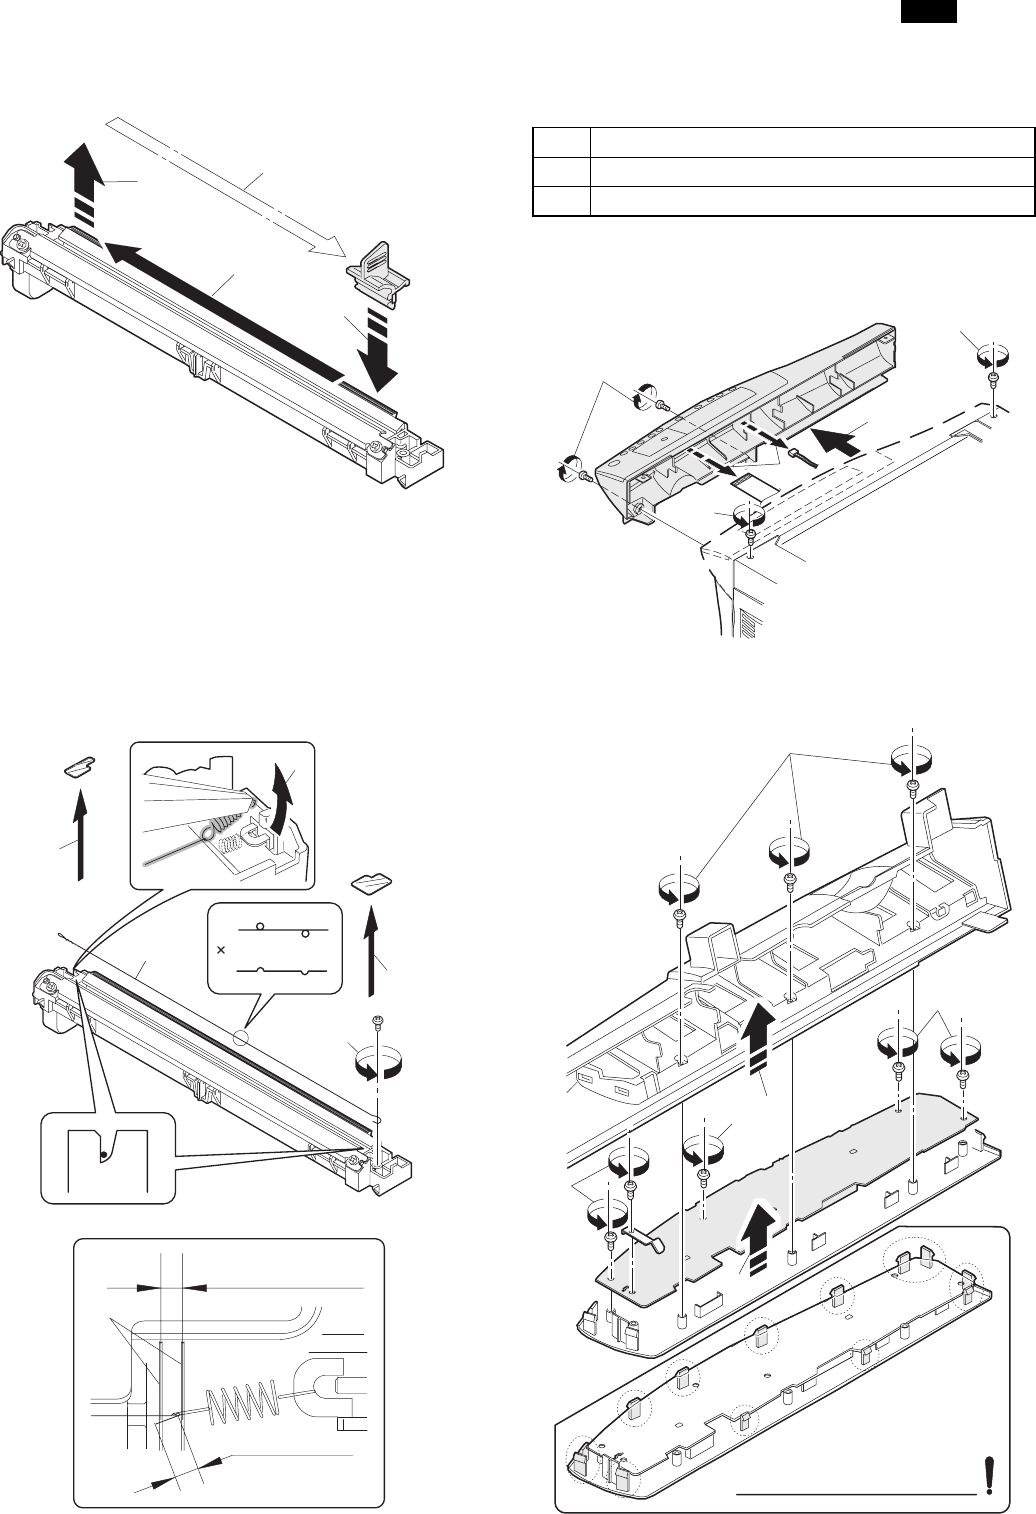
- 2. Operation panel section 47
- 3. Optical section 48
- 4. Fusing section 49
- B. Disassembly procedure 49
- PPD2 sensor 50
- Heat roller 51
- CAUTION:Attach 54
- 6. Manual paper feed section 56
- Wire treatment 57
- 7. Rear frame section 60
- 8. Power section 61
- 9. SPF section 61
- A. Sensor PWB 62
- B. Pickup solenoid 62
- C. Clutch 62
- F. SPF motor 63
- G. Paper entry sensor 63
- 10. 2nd cassette section 64
- B. Cassette detection SW 65
- C. Paper feed solenoid 65
- D. Transport roller 65
- E. Paper feed clutch 65
- F. 2nd paper feed roller 65
- B. Intermediate tray 67
- C. Upper cover 67
- D. Pickup unit 68
- F. Sensor PWB 68
- G. Pickup solenoid 68
- H. Clutch 69
- J. Transport unit removal 70
- K. Belt 1 70
- L. Belt 2 70
- M. SPF motor 70
- N. Solenoid 70
- O. Clutch 71
- P. PS roller 71
- Q. Paper entry sensor 71
- R. Transport roller1 72
- S. Paper exit roller 72
- 14. FAX, MCU PWB section 73
- (AR-F152 only) 73
- D. Remove the PWB cover FAX 74
- E. Remove the MCU PWB 74
- B. Remove the metal fixtures 74
- ROM (AR-F152 only) 77
- [8] ADJUSTMENT 78
- Set screw 79
- Scanner unit drive pulley 79
- Copy lamp unit projection 79
- Image distortion check chart 79
- Document 80
- Greater distortion 80
- Smaller distortion 80
- Copy image dimension 82
- Original dimension 82
- D. Image position adjustment 83
- B4 or 8 1/2″ × 14″ paper 84
- A4 size rear edge 84
- 2. Copy density adjustment 85
- 3. High voltage adjustment 86
- 4. Duplex adjustment 86
- Scale (D-D mode) 87
- 5. Density section 88
- 6. Communication section 89
- 1. List of simulations 90
- AE, Main cassette lamp 101
- AE lamp (Blinking) 101
- AE, TEXT lamp 101
- AE, TEXT, PHOTO lamp 101
- B. List of functions 103
- A. Software Switch List 109
- 5. TROUBLE CODES 118
- (1) Sending error 119
- (2) Reception error 119
- (1) LCD: FAX SERVICE ERROR(#) 119
- [10] USER PROGRAM 120
- [11] MAINTENANCE 121
- [12] ELECTRICAL SECTION 122
- B. MCU PWB unit 123
- FAX PWB UNIT 124
- 2. Circuit descriptions 125
- (2) ASIC (Signal table) 127
- LCD PWB 134
- NSFX200 (IC503) supplies 135
- Input Signals 135
- Output Signals 135
- Input/Output Signals 136
- (2) NS32FX164 (IC507) 136
- Input-Output Signals 137
- (4) CPU interface 138
- (5) Image memory interface 138
- (6) Others 138
- Motor control 140
- Bus control 140
- LBP module 141
- 6. LCD circuit (AR-F152 only) 142
- C. LCD panel pin arrangement 143
- [13] CIRCUIT DIAGRAM 144
- MCU 2 (INPUT SECTION) 145
- MCU 3 (OUTPUT SECTION 1) 146
- MCU 4 (OUTPUT SECTION 2) 147
- MCU 5 (ASIC SECTION) 148
- MCU 7 (CONNECTOR SECTION 2) 150
- MCU 8 (CONNECTOR SECTION 3) 151
- FAX LCD PWB (AR-F152 Only) 162
- ACTUAL WIRING DIAGRAM 1/5 164
- ACTUAL WIRING DIAGRAM 2/5 165
- ACTUAL WIRING DIAGRAM 3/5 166
- ACTUAL WIRING DIAGRAM 4/5 167
- ACTUAL WIRING DIAGRAM 5/5 168
- SHARP CORPORATION 170
Prodotti e manuali riguardandi Fotocopiatrice Sharp AR-151
 (2 pagine)
(5 pagine)
(2 pagine)
(5 pagine)
 (88 pagine)
(34 pagine)
(181 pagine)
(12 pagine)
(5 pagine)
(1 pagine)
(13 pagine)
(9 pagine)
(8 pagine)
(24 pagine)
(41 pagine)
(56 pagine)
(88 pagine)
(34 pagine)
(181 pagine)
(12 pagine)
(5 pagine)
(1 pagine)
(13 pagine)
(9 pagine)
(8 pagine)
(24 pagine)
(41 pagine)
(56 pagine)
 (43 pagine)
© 2020, manymanuals.it. Tutti i diritti riservati | 0.036 s |
 Manymanuals.com
 Manymanuals.de
 Manymanuals.fr
 Manymanuals.it
 Manymanuals.pl
 Manymanuals.cz
 Manymanuals.es
 Manymanuals-pt.com
Commenti su questo manuale